First, create a new image, 400x400 pixels and fill the background with the color that you like.
Use Type Tool [T] to create text that you want to make look like metal. For the best result use large text, e.g. size 75+.
The color of the text does not matter so fill it with any random color.
Step2
Now is the time to add Inner Bevel to your shape. Right click on the text layer and select Blending Options...
Layer Style window will open, select the settings that you see on the screenshot.
Step3
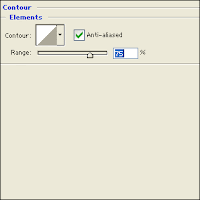
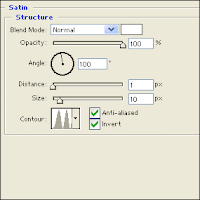
In the Layer Style window select Contour, Satin, Gradient Overlay on the left and use settings that you see on the screenshot.


Step4
Press ok when you done and your image should look like mine.
Congratulations, you now know how to create metal text in Photoshop.


4 comments:
oh wow! that's nice!
btw, thanks for visiting allinkorea! have a nice day!
hey nice effect! have you tried cs4? i've heard they released the new version of photoshop already
=============================
hey i have a little request, can you replace my old url leviuqse.blogspot.com (retarded’s notebook) to my new one, http://www.retardedsnotebook.com
thanks thanks thanks!
have a great day!
Hi dear! Thanks for being part of the Momhood Moments Blog Party! Here is the list of the attendees, please don't forget to place the code on your side bar. :) thanks!
Code found HERE.
Maricel
Business Mars
hey i have got a pagerank 1 blog site regarding mobile games and stuff, we can have a link exchange if you want, that would be helpful for both of us.
my site: http://mobi123.blogspot.com/
email: levisinside0@gmail.com
Post a Comment