Saturday, January 31, 2009

Thursday, January 22, 2009
Saturday, January 10, 2009
Make Barcode Sample
Step1
Open a new Photoshop file with 250x200 px dimensions. Make the colour of background white and the color of filling black with SHIFT-(D). Draw a line at the 1 px thickness like beside.

Step2
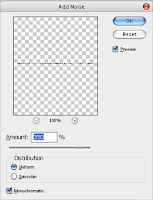
When The Layer belong to the line is selected, click on Fitler > Noise > Add Noise.
Step3
Just after that, click on CTRL+(T) or Edit > Transform > Scale. Keep it on the point indicated with blue arrow beside and drag it above with the aid of SHIFT button until you get the Picture beside.
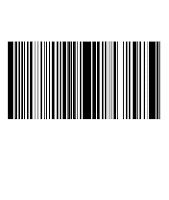
Step4 Select an area how much you want to cut with Rectangular Morquee Tool and erase this part with DELETE button .Write what you would like . The result should be like beside. There is no need to struggle too much. If you would like you can use writing fonts as ready-made barcode by searching in google.com as Barcode Fonts.

Open a new Photoshop file with 250x200 px dimensions. Make the colour of background white and the color of filling black with SHIFT-(D). Draw a line at the 1 px thickness like beside.

Step2
When The Layer belong to the line is selected, click on Fitler > Noise > Add Noise.

Step3
Just after that, click on CTRL+(T) or Edit > Transform > Scale. Keep it on the point indicated with blue arrow beside and drag it above with the aid of SHIFT button until you get the Picture beside.

Step4 Select an area how much you want to cut with Rectangular Morquee Tool and erase this part with DELETE button .Write what you would like . The result should be like beside. There is no need to struggle too much. If you would like you can use writing fonts as ready-made barcode by searching in google.com as Barcode Fonts.

Tuesday, December 30, 2008
Make Magic Shine
Step 1
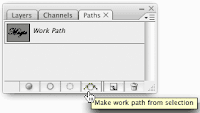
Create a new document 400 x 300px and fill it will black. Type the text in "Edwardian Script ITC", font-size 160 pt. Then, Go to the path palette and press the Make work path from selection button.

Step 2
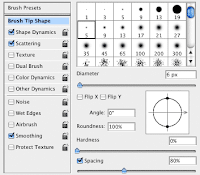
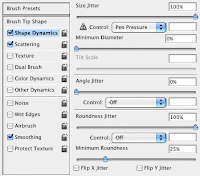
Now the text is a path it is posible to stroke it with the brush. But before that you need to change the brush options.

Step 4
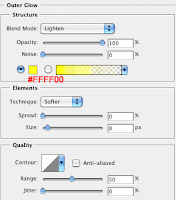
Go to the layer palette and double click on the layer miniature of the sparkles layer to open the layer style window. Go to Drop Shadow and change the values as shown below:

Create a new document 400 x 300px and fill it will black. Type the text in "Edwardian Script ITC", font-size 160 pt. Then, Go to the path palette and press the Make work path from selection button.

Step 2
Now the text is a path it is posible to stroke it with the brush. But before that you need to change the brush options.


Step 3
Now the brush is ready to stroke the text. Go to the layer palette and delete text layer or make it invisible. Make a new layer. Set white as the foreground color. Go to the path palette and right click om the Work Path and choose Stroke path. In the window that now appears choose for Brush and make sure Simulate pressure is not checked. The stroke is a little to hard to make this better: Change in the brushes palette the following options: Brush Tip Size: Diameter to 4px and Spacing to 130%. Scattering: Scatter 600% Stroke the path again but this time with the option Simulate pressure checked. Click in the palette path on an empty area. That way the path becomes inactive.

Step 4
Go to the layer palette and double click on the layer miniature of the sparkles layer to open the layer style window. Go to Drop Shadow and change the values as shown below:


Subscribe to:
Posts (Atom)


